Pages

Thursday, December 6, 2012

I've Moved - New Blog Address


I've had a new website and blog designed thanks to Candour - purveyors of strategic branding and graphic design. Click on over and check out www.MeaganChaneyGumpert.com. There's a tab for my blog page.

If you've been following along with me through an RSS feed, this should have transferred to my new page, but if you're missing out, just let me know and we'll see if we can get the situation resolved.

Cheers!

Friday, October 5, 2012

Low Fire Friday - Glaze layering (Guest Artist Martina Lantin)


What a treat to have Martina Lantin as this month's Low Fire Friday Guest Artist. And Martina is sharing not 1, but 2 recipes with us!  Whoohoo!
I had the pleasure of meeting Martina while we were teaching at Arrowmont School of Arts and Crafts this past August. Though I've know her work for awhile, it's always great to meet the maker behind the handmade. Instantly, I was won over by her easy going, but professional nature and enjoyed conversations we had in and out of the studio all week.
 
Born in Montreal, Canada, Martina Lantin received her Bachelor of Art from Earlham College (1996) and her Master of Fine Art from NSCAD University (2009).  She has been an artist in residence at Baltimore Clayworks in Baltimore, MD and Arrowmont School of Art and Craft in Gatlinburg,TN.  Currently, Martina is a professor at Marlboro College in Marlboro, VT.

Selected as an Emerging Artist by Ceramics Monthly (2002), her work has been recognized in numerous juried and invitational exhibitions. In 2010 Martina was award an Individual Artist Grant by the Tennessee Arts Commission.  She has also published articles in both Studio Potter and Pottery Making Illustrated.

Committed to the joys of working in earthenware, which she describes as chocolate porcelain, Martina creates functional ceramics through thrown and altered forms.  The thin layer of white slip serves to accentuate the construction methods and to invite an exploration of the making process.


Here are the low fire glazes and application technique Martina is sharing with us today:

 WOODY HUGHES BASE GLAZE – CONE 04 – good with colorants

Gerstley Borate
26
Lithium Carbonate
4
Frit 3124
30
NephalineSyenite
20
EPK
10
Flint
10

Colorants can be metallic oxides or carbonates or mason stains, singly or in combination. 

Colors in the image:

Blue green:   2% copper carbonate and 3% deep orchid stain
Violet:            5% orchid stain and 1.5% rutile

OPAQUE GLOSS: (rated for cone 015 – as an over-glaze enamel)

Frit 3134
36.4
Pemco ‘P-25’ (frit 3269)
55.6
EPK
8
Add tin
10

Colorants – stains or oxides.  Do your own tests to develop your palette – start with 2 – 10 %

First, the Opaque Gloss is slip trailed onto the piece (in the example photo - the colors you see are from the slip decoration applied prior to bisquing).  Spaces in the design motif can be filled in with colored versions of the Woody Hughes base (brush application works best for filling in areas with color).  Woody Hughes base glaze is applied to cone 05 bisqueware, ideally poured or dipped.


You can also play with waxing over the colored Woody's glazes or not – depending on the fluidity desired.  The clear Woody's Base glaze can be very thin for dipping, however when the stains or oxides are added for the colored glazes, thicker is better for brushing purposes.

Martina then fires to cone 03 using a kiln sitter or cone 04 when using a computer program with cone 04 on the program and 25 minute hold at the end.

So, there you have it! Martina let us in on some of the secrets of how she gets such beautiful, fluid results in her work! 

Hope you're having a wonderful Friday!

Meagan


Sunday, September 16, 2012

Our New Addition


I'm happy to announce that Fletcher Elliot was born Thursday, September 6 at 9:23 am weighing 6lbs 11oz and 20" long. We had another wonderful, natural birth. Hooray!
 We are all doing well and are settling into life as a family of four. Even Big Brother Cooper
Cheers!

Friday, September 7, 2012

Low Fire Friday - Amaco Velvet Underglazes

During the Arrowmont Residency Reunion this past May, we (the 50 former Resident Artists that attended) were encouraged to collaborate on various projects that would be donated to Arrowmont for display, auction, or the permanent collection.

In the ceramic studio we tackled making 100+ mugs that would be left in the dining hall for student use during the course of Arrowmont's one-week workshops. Most of the mugs that resulted from this exciting project were touched by multiple hands. Someone would throw/trim the mug, someone else would add a handle, then it would get passed along for decoration/surface design. After it was bisque fired, someone else would apply the final glaze and then it was off to get fired again.

During the course of this process, I found myself as a "decorator" and discovered a new obsession - Amaco Velvet Underglazes!


Here is the finished Arrowmont Official Birthday Mug. I wish I could report who made the mug and who added the handle, but Brian Hiveley did the carving and illustration and I worked on the underglazes.

The underglazes were applied to greenware. After bisque firing, a black mason stain wash was applied and then a clear glaze was applied over the entire surface.

Look at the amazing color range available from Amaco!

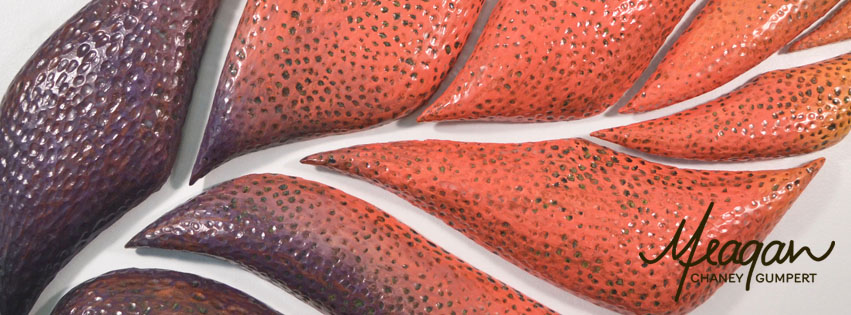
The color palette in my work has been getting brighter and brighter over the years. (Possibly coinciding with living in Florida?) And I'm now finding that these underglazes are just what I was looking for to add that extra pop of color and still allow me to get a smooth gradation I've been wanting.

Invigorate, earthenware and kiln cast glass, 16" x 13" x 7"

The piece above had 2 coats of Amaco's Hunter Green, Blue Green, Teal Blue, Royal Blue, and Purple mixed and blended on greenware and then fired to cone 04.

I doubt I've given up my crunchy, crawly glazes, but this new direction excites me! And for those reading who may not be into mixing their own glazes, I thought it would be helpful to know some great commercial glaze options.

Cheers!

Friday, August 24, 2012

Low Fire Friday: Bonus Edition - Reader Results with Crawl

I recently received an exciting email from a reader who has been working with the Low Fire Crawl glaze I featured in January's Low Fire Friday segment.

Rand O'Brien from New Hampshire writes:

"I have been using your Magnesium crawl in raku with wonderful results. The spaces between the beads seal against carboning and the beads "stick" very well. Your dark Turquoise develops a beautiful luster in reduction."

How exciting! It wouldn't have occurred to me to try this same glaze with a different firing method, but Rand is getting beautiful results! Kudos to you!

Here's a re-posting of the Low Fire Crawl recipe Rand is referring too:

Crawl Glaze - Cone 04

Gerstley Borate            46.5
Magnesuim Carbonate 31.0
EPK                            18.6
Borax                            3.9
______________________
                                  100.0
+ Zircopax                     5.5

For color add...

Beige/pale yellow: + red iron oxide 1%
Dark turquoise/jade: + copper carbonate 5%
Light turquoise/jade: + copper carbonate 1%
To see glaze test tiles of this recipe fired to cone 04 check out the original LFF post

Rand, Thank you so much for sharing your results! That luster halo with the turquoise is amazing!

If anyone else has tried any of the Low Fire Friday glazes and would like to share how they've worked for you, email me at info@MeaganChaney.com and I'll be happy to put together a Bonus Edition featuring your work.

Cheers!
Meagan


Friday, August 3, 2012

Low Fire Friday - A brief into to glazes and glaze mixing


Glaze – A Brief Intro

A glaze is glassy substance that has been adhered to the surface of ceramics through firing. It is made up of a glass former, a stabilizer and a flux

 The glass former is the glass. Typically this will be in the form of silica/flint

The stabilizer is what keeps the glass from completely running off of the ceramic piece.
Alumina is the main stabilizer and is found in clay.

The flux is an oxide (generally Alkaline) which causes ceramic fusion when combined with other oxides and heated.

Glaze recipes are usually written as a list with ingredients totaling 100%. This base glaze is usually clear/white. Any colorants, opacifiers, suspenders, and gums are written below the 100% line and are added as a percentage of the total glaze.

Base 4 
Base Glaze
Frit 3195
65

Gerstly Borate
10

Wollastonite
15

EPK
10


100


Bentonite
2


Colorants


Dark Brown
Red Iron Oxide
10

Glazes are usually measured and mixed by weight. However, any unit of weight can be used as long as it is constant throughout the entire recipe. I weigh my materials out in grams and typically mix a 500g batch (about the size of a large yogurt container). This means that I would multiply each material the recipe by 5. 

So, I would actually be measuring and mixing the above recipe like this…

Base 4 
Base Glaze
Frit 3195
65
325g

Gerstly Borate
10
50g

Wollastonite
15
75g

EPK
10
50g


100
500g


Bentonite
2
10g


Colorants


Dark Brown
Red Iron Oxide
10
50g


Water is added until the desired consistency is reached. This is a matter of preference and application technique. I brush my glazes on super, SUPER thick, so my glazes are usually about the consistency of Greek yogurt.

I hope this answered a few of your questions and will help get you started if you're new to glaze mixing. If you have any other questions, please feel free to comment or email me. 

Cheers!
Meagan

Friday, July 6, 2012

Low Fire Friday - Base 3

Recently, I've been doing a lot of tests and line blends looking for a reliable, food-safe, base glaze that works well with Mason Stains. And I think I just may have found one that suits my needs!! 

Base 3 has a glossy surface, though not super crazy shiny. It's a bit semi-opaque with lower percentages of stains, and becomes opaque when higher percentages are added.


Base 3 - Cone 04

Frit 3134       75
EPK             15
Silica             10
__________________
                   100

Bentonite         2%


For color add...
The Mason Stains I've tested are:
  • #6236 - Chartreuse
  • #6026 - Lobster
  • #6379 - Robins Egg
  • #6025 - Coral Red
  • #6201 - Celadon
The test tiles pictured have line blends of these stains. A line blend is an easy way to get fairly quick results when testing colorant/stain in a glaze.

I mixed up a 100g batch of Base 3 for each of the above Mason Stains. (That's five separate 100g batches.) For each batch I started by adding 1% Mason Stain, or 1g. Then, to test how the glaze would look with 3% Mason Stain, I added 2g. Yes, only 2g because my 100g test batch already has 1g in it. For a 5% Mason Stain, I then only needed to add another 2g, and so on. It can get tricky so I always write all this down before I get started. Between each addition I brush a stripe on my test tile before moving on and adding more Stain.

I tested each Stain at 1%, 3%, 5%, 8%, 10%, 12%, 15%, 18%, and 20%. Some of the differences are too subtle to see in these images, but are more viable in person. 

This will give you a nice range of color saturation for each Stain. From these results you can decide what you like and do further testing if desired.

So, for example, if you like the color/look of the third stripe from the left on the Celadon Line Blend, then you would mix up the Base glaze with the addition of the 2% Bentonite and then 5% Mason Stain #6201 - Celadon.

I've labeled each image with the Mason Stain used and tried to test all colors on both red and white clay. (Though you can see the state of some of my test tiles is a bit rough and I'm missing red clay samples for the Lobster Stain and Chartreuse Stain.) 


Lots of testing, but if you're (crazy) like me, you love this part of the process! If you've got questions, just leave a comment or shoot me an email.

Well, happy glaze testing.
Meagan